The Hip and Groin: Focusing on the Myofascial Component
Marc Heller, DC
After writing my recent article on the hip, and after reading Lucy Whyte-Ferguson's hip chapter,1 I thought I really understood how to treat the disordered hip. I had great success with the first few patients with these methods, but then...
A 50-year-old male came in with a chief complaint of "stiff hips." On exam, he had 0 degrees of internal rotation in his right hip, and -5 degrees in his left hip. I thought I knew what to do, and went ahead with some brief muscle stretching and the wishbone maneuver, as outlined in my previous article.2 After a couple of visits, he was basically unimproved. The wishbone technique, by itself, only seemed to give him a few degrees of temporary improvement. I went back to the book, reread the hip chapter, and reassessed his muscles with the length and motion testing outlined there. The key appeared to be his adductors. I deeply stretched them with contract-relax, with better improvement, maybe 5 to 8 degrees. On the next visit, he was back where he had started, and we really went after the musculature. Besides stretching the muscles, we used the Graston technique (instrument-assisted frictional massage) on the adductors and gluteus medius. Finally, he achieved a decent range of motion.
So, what's the lesson here? In short, address both the muscles and the joints thoroughly.
Dr. Whyte-Ferguson outlines an elegant muscle-assessment protocol. Take the lower extremity through various ranges of motion, and see which muscles tighten up and stop the motion. Dr. Whyte-Ferguson has noticed that when she takes the femur into internal rotation, the muscles that seem to tighten and limit this key motion are not just the obvious ones. She found that the piriformis and other external rotators tighten or resist this motion only 30 percent to 40 percent of the time, and that the psoas and adductor group create about 60 percent to 70 percent of the restriction.
Why is this? In my first hip article, I mentioned the "bowstring" metaphor that Dr. Whyte-Ferguson hypothesizes. The combined anterior pull of the psoas and medial pull of the adductors add up to a vector that subluxes the head of the femur, antero-laterally. As they say, a picture is worth a thousand words:
You should now have a mental picture of why the psoas and adductors are so important to the whole pelvis, hip and groin. You also have a way of testing whether these muscles are important in a particular patient. The next issue for some of you may involve your patient's (and your own) comfort level for working in the groin region. Study your anatomy and know exactly what you are touching. You may or may not be comfortable working in this area.
Here are some basic principles of touching sensitive areas. Tell the patient what you are going to do and why. "I am going to check and release some of the muscles that connect your pelvis to your hip." Make eye contact, and ask their permission explicitly. Every time I touch the groin, chest or buttock, I make sure to tell the patient first, "If anything I do feels unsafe, inappropriate, or not OK, let me know immediately." If I suspect a history of sexual abuse, such as the patient not maintaining eye contact with me when I talk about what I am going to do, I am extra cautious. Don't forget to start very gently. I have done a brief survey recently with my female patients, asking about what position feels safer for this deep groin work. The consensus is that working supine, where you and the patient can maintain eye contact, is "safer" than prone.
Let's talk about a whole series of ways to release these muscles. At one point in my career, I felt that I should just release the joints, cranium and viscera, and teach the patient to stretch and strengthen their own muscles. I have since come to realize the incredible power of the doctor and/or therapist actively releasing the muscles and fascia at origin, belly and insertion. The patient cannot effectively do these techniques by themselves. Once you do this, the patient will get much more benefit from their exercises.
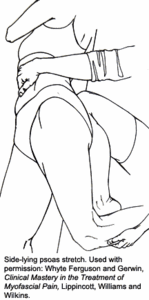
Side-Lying: The Psoas, Rectus Femoris, Quadratus Lumborum and Abdominal Obliques
Place the patient side-lying and extend the thigh, both with the knee straight and with the knee bent, to evaluate (and treat with contract-relax) the iliopsoas and rectus femoris. I prefer to flex the other hip up to the chest and have the patient hold it there. You can use this same side-lying position, with a pillow under the patient's belly, to assess and treat the quadratus lumborus and abdominal obliques. Dr. Whyte-Ferguson uses side-lying, supine and prone methods to release the psoas. The prone method is new to me and makes the muscle easy to get to, so I'll show you a picture of it:
With the patient prone or supine, you can take the hip into slight abduction, and then add internal rotation to the first barrier and assess which muscles are limiting internal rotation. The lack of internal rotation is the key direction for the hip joint. Check the medial musculature, including the adductors (adductor magnus, adductor longus and brevis, and pectineus), as well as the medial hamstrings. You can both assess and treat these muscles in the prone or supine position with stretching and manual-release work. Check the piriformis and other external rotators with the same internal rotation test. If they tighten, release them and recheck. Don't forget the TFL and gluteal muscles.
Adductors
If you get only one thing from this article, here's what it should be: The adductors are a critical group of muscles for all pelvic, hip and/or groin problems. The rest of the article focuses on how to release them, in a supine or prone position. Prone position gives you a little easier control of the lower extremity. The supine position has the advantage mentioned above, of safety and eye contact. You will probably end up using both to fully release the muscles. I tend to use supine for the work closest to the groin.
Here are five specific muscle-release methods. I will describe them as if I am taking the right leg into slight abduction and hip internal rotation, while feeling the medial thigh for tight bands in the adductors. These muscle and fascia release techniques can be used on any part of the body, and the principles apply, well, virtually anywhere.
Pressure With Stretch
Have the patient prone or supine. As you passively take the thigh into internal rotation, you palpate which fibers of what adductor muscles are tightening. You can start by just putting pressure on those fibers, as you passively take the limb into further motion in the restricted direction. You can add a three-dimensional pressure with your left hand, using myofascial release principles. In other words, use your educated hand to feel for the three-dimensional barriers within the tight band and release, either in the direction of the barrier (direct) or in the direction of ease (indirect).
Contract-Relax Assist
Sometimes you can get an even more complete release by adding another component. Dr. Whyte-Ferguson calls this "contract-relax assist." It is very similar to Mattes' active isolated stretching (AIS). After doing contract-relax, have the patient attempt to push the leg further into abduction or internal rotation. Use your hand to create resistance and make it isometric. Have the patient hold for three to five seconds, and then take the leg further into internal rotation/abduction. Make the direction simple in one plane, so you don't confuse the patient too much. In other words, they are contracting, using their antagonist muscles to attempt to move the limb farther in the direction you want it to go. This firing of the antagonist creates a reciprocal inhibition of the muscles (in this case, the adductors) that you want to release.
Percussion
I am not an expert on this method, by any means. It was developed by Janet Travell, MD. I recently started using it and find the results fascinating. It doesn't take much force, and the equipment is already in your office. Find the tight knot or band, and tap it gently, slowly and rhythmically eight to 12 times with your reflex hammer. You'll be amazed at how the tight spot releases.
Frictional Massage
I tend to use this most on the insertional tendinopathy component of fascial problems. Find the tender points on the origin or insertion of the ligaments or muscles. Make small cross-frictional motions with either your reinforced fingers or a metal instrument. You also can go in various directions, finding where the grit or further barriers are in multiple directions. This can be very effective at the origins of the various adductor muscles and the anterior hip ligaments (the iliofemoral is more accessible), as well as around the posterior trochanter for gluteal and piriformis insertions.
Your effectiveness will improve by having the area on a stretch, using contract-relax and contract-relax assist while you do the frictional massage. How? You are creating further receptor stimulation, and the patient participates more actively, retraining their musculature. When I am doing this supine, for the adductor longus and pectineus, I take the leg into abduction and add slight internal rotation. For the adductor magnus, the origin is from the inferior pubic ramus, so I'll take the thigh into flexion first, contact the tender origin points, and then stretch into abduction and internal rotation.
Since I've focused on the adductors here, I should mention the important joints to assess and release. Obviously, use the wishbone maneuver to reset the hip joint. Address the pubic symphysis. Check the SI and lumbar joints. Assess the knees, ankles and feet. The patient needs to stretch the adductors and psoas, and work on core stability. The adductors should be stretched in neutral, not in external rotation. External rotations can re-sublux the hip. These new ways of assessing and treating the hip and its musculature have been profound in my practice. I know this information; it will help your patients once you start to apply it.
References
Whyte-Ferguson L, Gerwin R. Clinical Mastery in the Treatment of Myofascial Pain. Lippincott, Williams & Wilkins, 2005.
Many relevant diagnostic signs are not performed deliberately by the examiner or by the patient at the examiner’s direction. They are observed as the patient reacts to their condition. Fortin’s finger sign, Minor’s sign, and Vanzetti’s sign are three examples of this principle.
On Feb. 1, 2024, two more legislators – John R. Carter (R-Texas) and Robert “Bob” Good (R-Va.) – co-sponsored the Chiropractic Medicare Coverage Modernization Act of 2023, bringing the co-sponsor total to 155, two more than the total achieved over the entire two-year congressional cycle in which identical legislation last appeared (2021-22).
While working at the Lovelace Medical Center in Albuquerque, N.M., one of the primary care physicians stated that imaging every patient prior to receiving chiropractic was not medically necessary. It was at that point I reconsidered the need for the imaging of every patient to avoid malpractice.